Blog: Jeremy Ellis aka @Rocksetta About Edge Impulse Group Data Collection

Date: 2 weeks during the end of Nov, 2020 Sharing of your Edge impulse projects live to other people needs a Pro paid account. Talk to them about your situation Contact Edge Impulse.


I am a Canadian Teacher who tries to simplify complex tech for my classroom and for my after school group with www.gearbots.org See my website at https://www.rocksetta.com/ for lots more links.


High School Group Data Collection of Acceleration Data using the students cell phones and a Nano 33 Ble Sense Arduino

So this is what my after school group experienced while using the Edge Impulse paid account that allows group sharing and data collection of an Impulse. Since my entire after school group is online, this ability to work together training a neural network was a great experience. Since I had never used the live interacting feature before it was also a learning experience for me. Also only a few students owned the Nano33BleSnese so this allowed all students to work together obtaining acceleration data from their cell phones. Our plan was to train the Impulse to recognize drawn letters using the accelerometer We chose the letters WORDS as they allowed us to make many words such as So, SOS, Word, Sword, Rod, etc, etc.


  1. Load EdgeImpulse.com I like to load both the Forum and Doc into their own tab before I login, so I can reference them.

  2. In Edge Impulse pull down your login name and select an Impulse or make a new one.


  3. Get used to the "Dashboard", lots, but not everything happens here.


    At the bottom of the "Dashboard" you can delete the Impulse, but more importantly be able to delete all the data if you quickly want to start again.


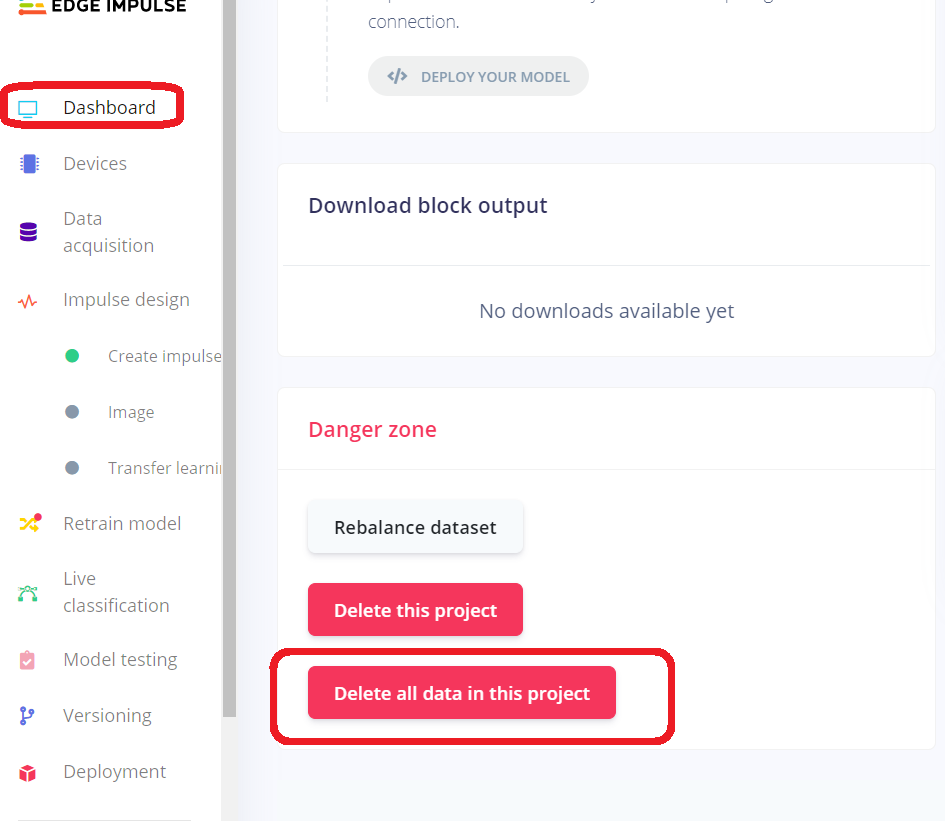
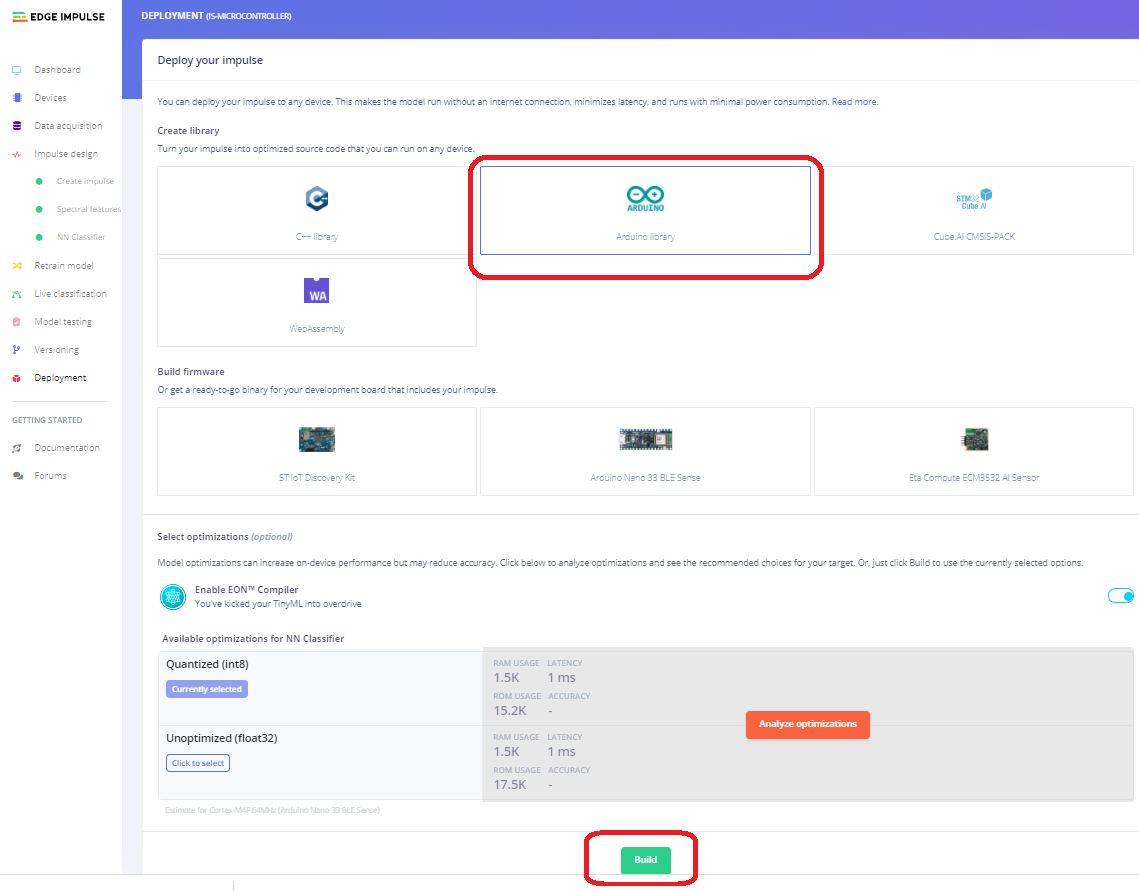
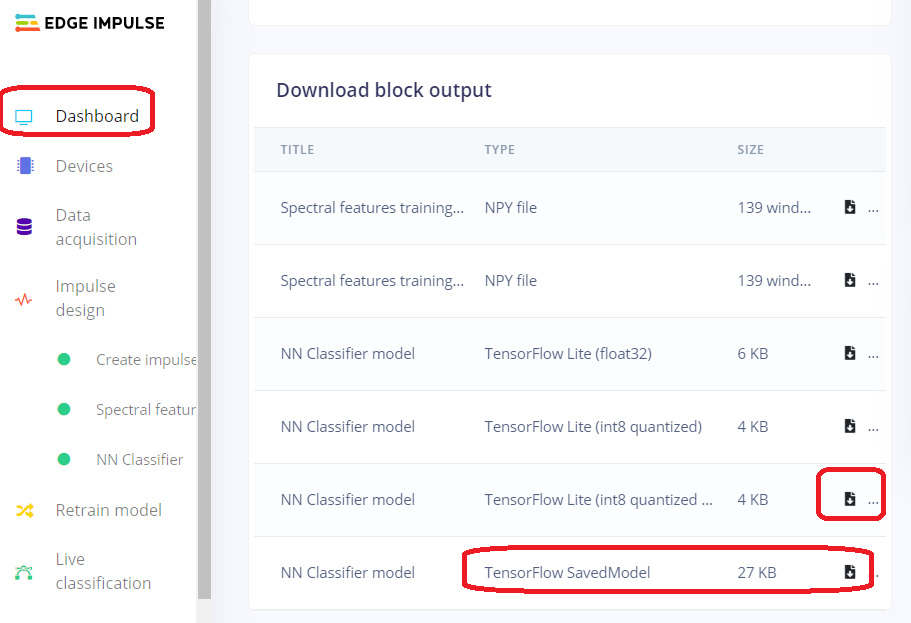
    Also note that at the bottom of the "Dashboard" when your Impulse is complete you will be able to find data downloads and Machine Learning Model downloads in various types of compression (Quantization)
    Again note that, if it is not on the "Dashboard" it will be on the left side-bar. We spend a lot of time using that side-bar to switch back and forth from important zones.


  4. Now start uploading data by either connecting your Arduino. See instructions or a choice that is much faster for acceleration, sounds or images is to use your cell phone.
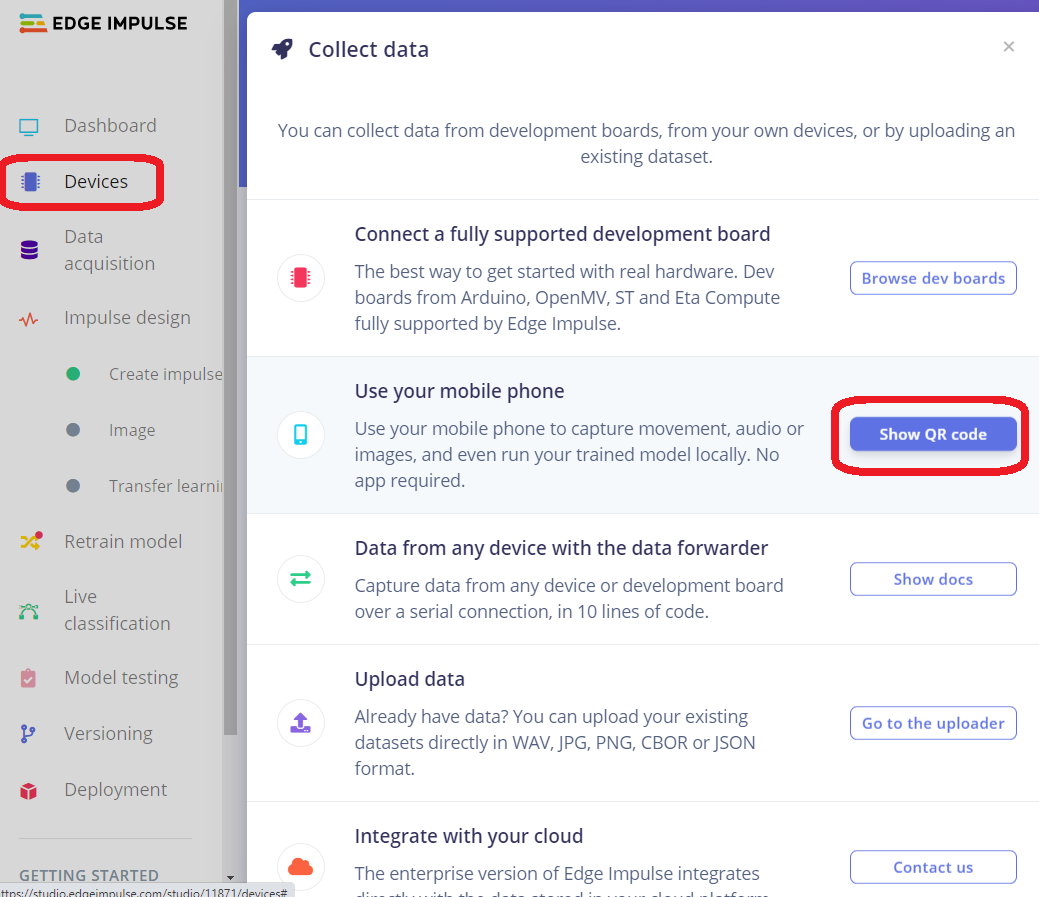
    You could also use your laptop or desktop computer for the sounds or images but be warned for images the cell phone is much easier to position the camera than working with your laptop.
    Connecting your device. Choose a device.


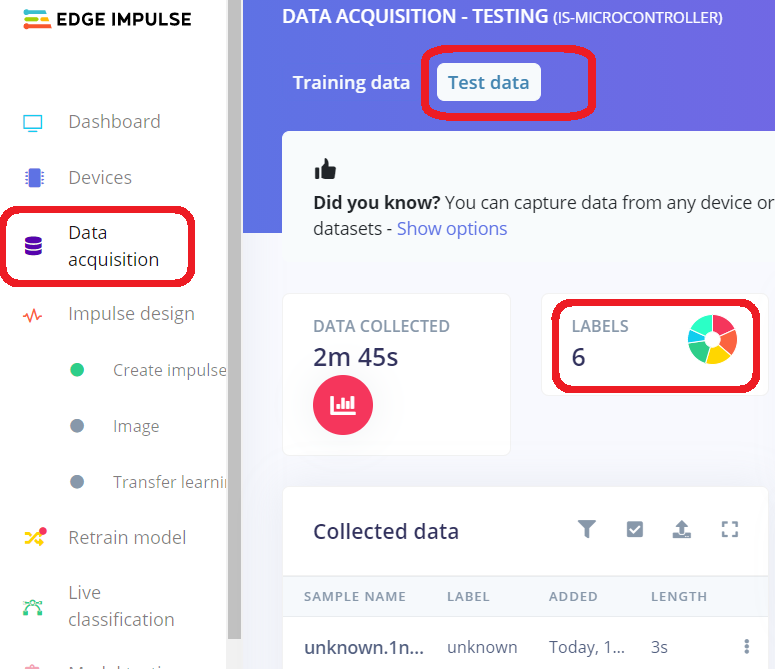
    See it activate on your phone. (The default says Image Collection)


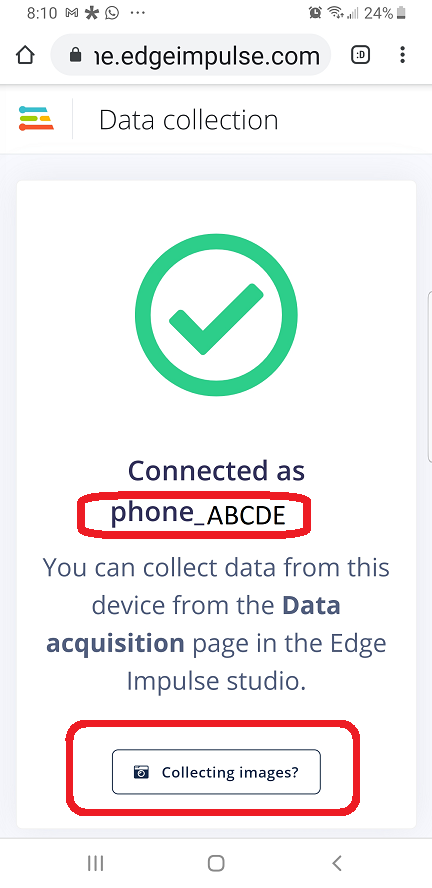
    This part is important for defining Images (The Default), Sounds or the Accelerometer sensor. A few things to note are the Label. It can be changed later but it is best to remember to change the label BEFORE taking a measurement.
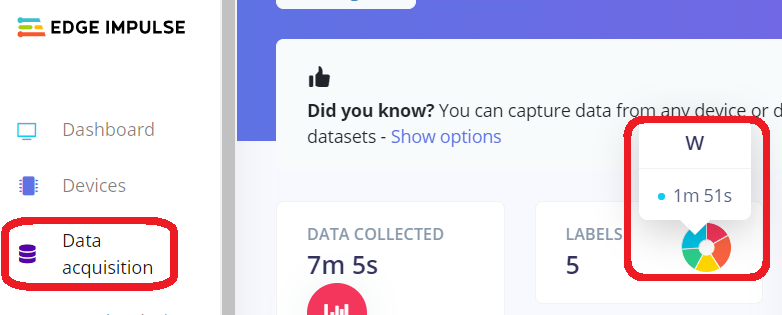
    Also note the duration. This is a bit confusing, we chose to take 3 second samples as that made the most sense for our experiment, You can take up to 10 second samples and let edge impulse afterwards separate all the individual samples (All with the same label). We chose not to do that method for this set of data.


  5. As the students and I got better at data collection I suggested that we try to get similar amounts of data. One of my students noticed this pie chart that when you mouse over gives you information about that label. This made it very easier for the group to monitor each other "live" while we were collecting data. Students that finished their label early started naturally helping other students that were having\ a hard time.


  6. Reminder you can let Edge Impulse auto split your data into Train and Test, but we had only 2 student with Nano 33 Ble Sense Arduinos, so we had them enter the test data, while the rest of us used our cell phones to train the Neural Network..


  7. Then I had one of the best teachable moments of my life! We looked at the Train (Cell Phone) and Test (Nano33BleSense) data. And it did not make sense. I have taught Technology for over 30 years, and one thing I love is when I can't do something. In fact in my actual classroom, teaching the teacher how to do something is one of the few methods my students have to get 100% on an assignment (They still have to do the assignment, they just get 9/9 instead of 8/9) Another day, ask me why I mark out of 9 and not 10.

    So I was stumped and the students had to solve the mess. They eventually started to look at the data and slowly one at a time solved the issues.
    1. The Z axis was affected by gravity, but not all cell phones had this the same (or students were just holding it wrong).
    2. If you held the Nano33BleSense upright with the USB cable pointing towards you, you had to hold the cell phone upright but twisted 90 degrees clockwise.

    These 2 points seem easy when told to you, but for a group of students to figure it out was a pleasure to watch.

    Here is an image showing data where the Z axis was obviously collected incorrectly as it has negative values, meaning the device was upside-down (or collecting data reversed)


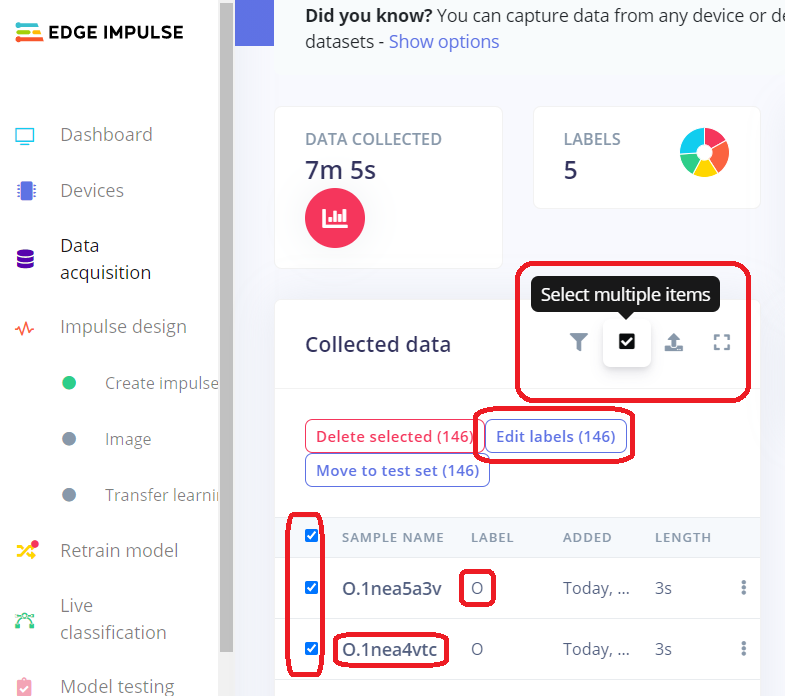
    Then I had one of my funniest tech experiences. We found out that some students labeled data as "unknown" and someone else had labeled data as "unknowns" I think someone else had used small letters and another one large letters, anyway the students found the multi-select tool and fixed the problem. And now every item was labeled capital "O" After a moment of horror, we realized that each measurement had an original file name and as a group we started renaming labels back to how they should be named.


  8. This label mess up reminds me to talk about "Versioning" Not completely intuitive but Edge Impulse allows storing a version of your project "Your Impulse". This version can then be loaded by any user as their own individual project. With a proper Paid account you could then re-share that project to your collaborators and continue on with this as a backup. For us, it allowed us to go back to a preivious version and save the data and see our impulse design and reload the information onto our main project.


  9. So we have still only just collected the data. Now it is time to make our Impulse (Neural Network, Machine Learning Model, Deep Learning Model etc). By Edge Impulse waiting for us to have the data, it can make some sensible decisions to help us choose our model design.

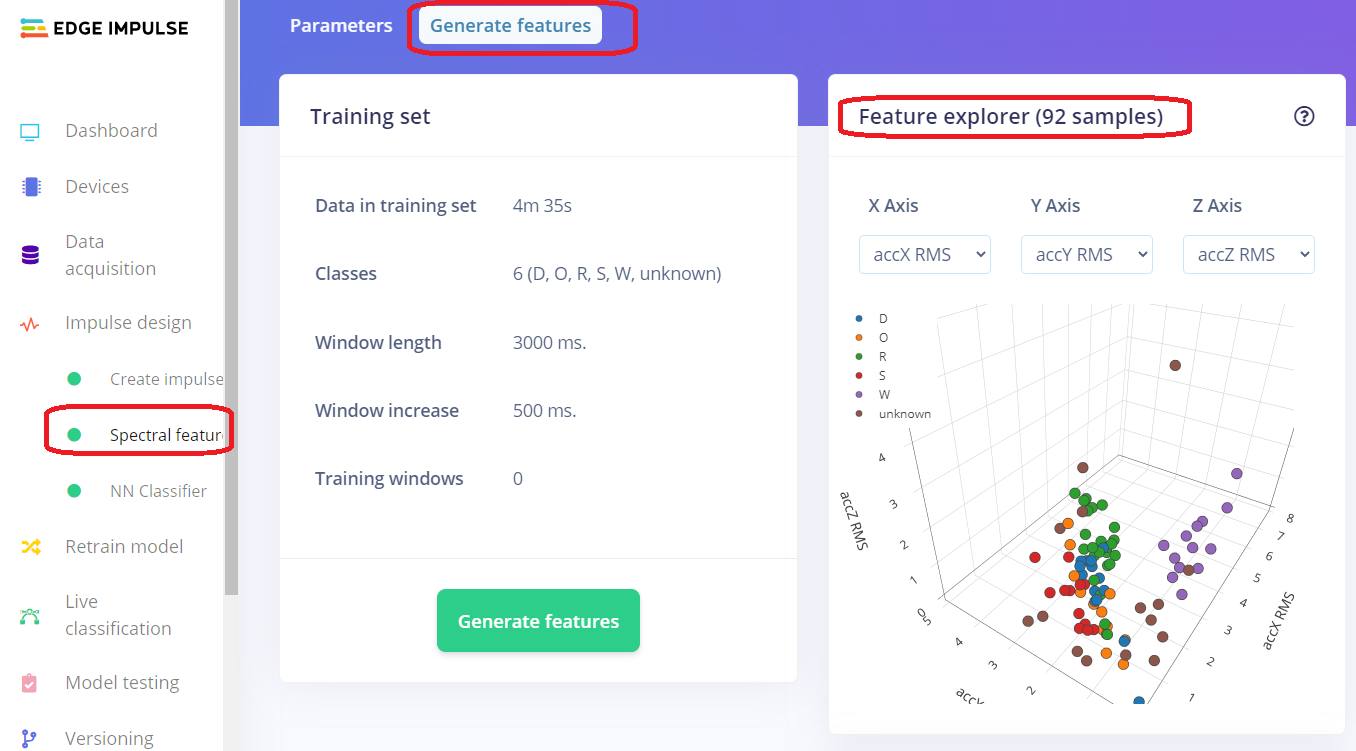
    First create the impulse, for acceleration the impulse should look sort of like this image. We are still changing things and would be open to suggestions. The students want to delete the z-axis, and I want about the 500 ms increase step.


  10. Next the Spectral features. This step can be confusing since the default tab is "Parameters", but we need to click on "Generate Features" to get started here
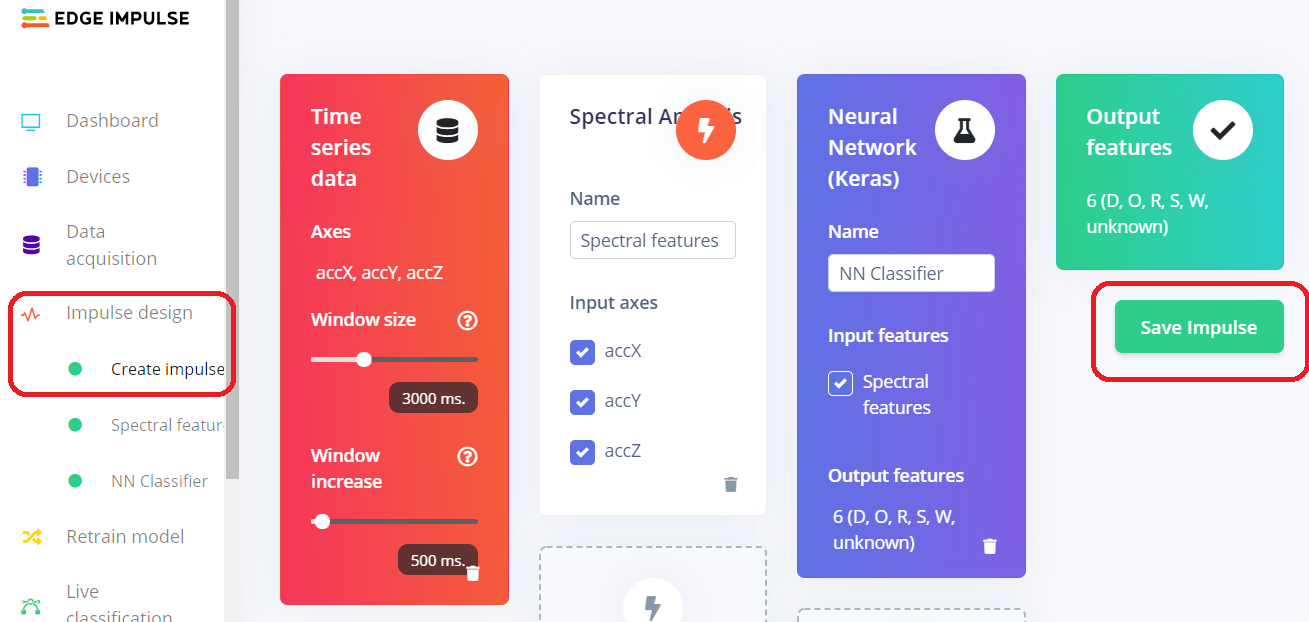
    Not visible in the image but somewhere there is a "start" button which does everything (or shows and error)
    The best part is the "Feature Explorer" animated 3D Graph. This is a pleasure just to use and rotate around to see your data points. Best of all it can help you identifier bad data and strange outliers. Also you can now click on a point and click a link to find and or delete that data.


  11. Now it is time to train your Neural Network using the "NN Classifier" The default values should be fine, my students changed things which may not have helped much. Click "Start Training" and go have a break. The confusion matrix can then show you that this model has some issue. So back to data collection, and repeat. Great for my students to realize that actually making a Neural Netork is not all Science, there is a bit of an Art to getting hyper-parameters and the data just right.
    Note that Edge Impulse allows you to edit your model design and somewhere you can actually write the code for the model if you must.


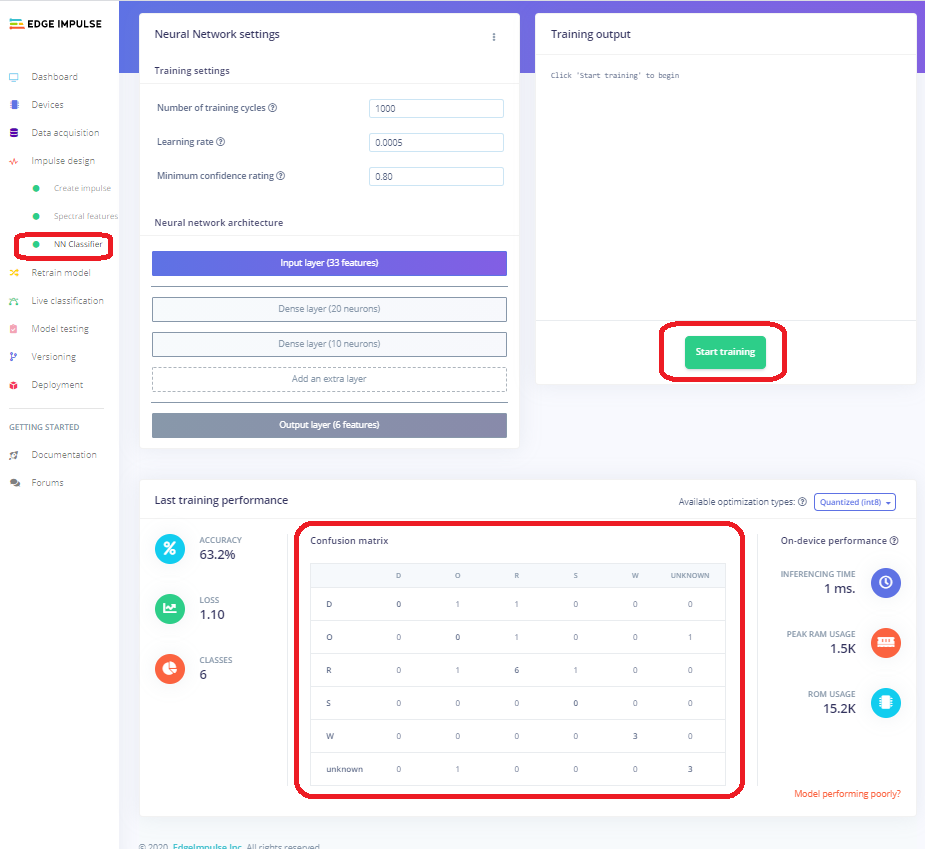
    So this week the class looked at the Confusion Matrix and tried to improve it. Here is what we got that looks much better. We also added an erase feature for our final app.


  12. Next deployment. We downloaded an Arduino Library, but you have several other options. Then hold your breath to see if it works.
    Actually this last step is easy for Arduino users, but a bit confusing if you are new to it. You download the zipped file to your computer Tell the Arduino Sketch-->Library Manager where to find the file. The go to examples --> Find your Impulse Named same as your prioject (even though the library had ie- infront of the name). In our case we loaded the acceleration static example and it worked. Just not very well for some letters. Back to the drawing board. We also need to change the given code file so that we can start using our Nano 33 BLE Sense to write words on the serial monitor just by moving the arduino in the shape fo the letters. Still work to do: P.S. There is one confusing thing for windows Arduino users which might be fixed by 2021 with a new Arduino IDE. It is a file that needs to be placed in the mbed section of your board. Fairly hard to find the location but the file just gets copied there. Here is the exact file with the exact file name https://github.com/hpssjellis/my-examples-of-edge-impulse/blob/main/windows-arduino/platform.local.txt