tfjs-models
BodyPix - Person Segmentation in the Browser
Note: We’ve just released Version 2.0 with multi-person support, a new ResNet model and API. Check out the new documentation below. For README of the previous 1.0 version, please look at the README published on NPM.
This package contains a standalone model called BodyPix, as well as some demos, for running real-time person and body part segmentation in the browser using TensorFlow.js.
Try the live demo here!
This model can be used to segment an image into pixels that are and are not part of a person, and into pixels that belong to each of twenty-four body parts. It works for multiple people in an input image or video.
To keep track of issues we use the tensorflow/tfjs Github repo.
Contributors
Main Contributors
- Tyler (Lixuan) Zhu, Twitter: tylerzhu3
- Dan Oved, Twitter: oveddan
Acknowledgement
- Daniel Smilkov, Twitter: dsmilkov
- Ann Yuan, Twitter: greenbeandou
- Per Karlsson, Twitter: karlssonper
- Irene Alvarado, Twitter: ire_alva
- Nikhil Thorat, Twitter: nsthorat
Special thanks for participants in the demo video
- Fabian Pedregosa, Twitter: fpedregosa
- Ross Goroshin, Scholar: ross_goroshin
Usage
You can use this with script tags as follows:
<html>
  <head>
    <!-- Load TensorFlow.js -->
    <script src="https://cdn.jsdelivr.net/npm/@tensorflow/tfjs@1.2"></script>
    <!-- Load BodyPix -->
    <script src="https://cdn.jsdelivr.net/npm/@tensorflow-models/body-pix@2.0"></script>
 </head>

  <body>
    <img id='image' src='images/person.jpg' crossorigin='anonymous'/>
  </body>
  <!-- Place your code in the script tag below. You can also use an external .js file -->
  <script>
    const img = document.getElementById('image');

    async function loadAndPredict() {
      const net = await bodyPix.load(/** optional arguments, see below **/);

      /**
       * One of (see documentation below):
       *   - net.segmentPerson
       *   - net.segmentPersonParts
       *   - net.segmentMultiPerson
       *   - net.segmentMultiPersonParts
       * See documentation below for details on each method.
       */
      const segmentation = await net.segmentPerson(img);
      console.log(segmentation);
    }
    loadAndPredict();
  </script>
</html>
Or you can install it via npm for use in a TypeScript / ES6 project.
$ npm install @tensorflow-models/body-pix
const bodyPix = require('@tensorflow-models/body-pix');

const img = document.getElementById('image');

async function loadAndPredict() {
  const net = await bodyPix.load(/** optional arguments, see below **/);

  /**
   * One of (see documentation below):
   *   - net.segmentPerson
   *   - net.segmentPersonParts
   *   - net.segmentMultiPerson
   *   - net.segmentMultiPersonParts
   * See documentation below for details on each method.
    */
  const segmentation = await net.segmentPerson(img);
  console.log(segmentation);
}
loadAndPredict();
Loading the model
BodyPix comes with a few different versions of the model, with different performance characteristics trading off model size and prediction time with accuracy.
To get started, a model must be loaded:
const net = await bodyPix.load();
By default, BodyPix loads a MobileNetV1 architecture with a 0.75 multiplier. This is recommended for computers with mid-range/lower-end GPUs. A model with a 0.50 multiplier is recommended for mobile. The ResNet architecture is recommended for computers with even more powerful GPUs.
If you want to load other versions of the model, specify the architecture explicitly in bodyPix.load() using a ModelConfig dictionary:
ResNet (larger, slower, more accurate) **new!**
const net = await bodyPix.load({
  architecture: 'ResNet50',
  outputStride: 32,
  quantBytes: 2
});
MobileNet (smaller, faster, less accurate)
const net = await bodyPix.load({
  architecture: 'MobileNetV1',
  outputStride: 16,
  multiplier: 0.75,
  quantBytes: 2
});
Config params in bodyPix.load()
-
architecture - Can be either
MobileNetV1orResNet50. It determines which BodyPix architecture to load. -
outputStride - Can be one of
8,16,32(Stride16,32are supported for the ResNet architecture and stride8, and16are supported for the MobileNetV1 architecture). It specifies the output stride of the BodyPix model. The smaller the value, the larger the output resolution, and more accurate the model at the cost of speed. A larger value results in a smaller model and faster prediction time but lower accuracy. -
multiplier - Can be one of
1.0,0.75, or0.50(The value is used only by the MobileNetV1 architecture and not by the ResNet architecture). It is the float multiplier for the depth (number of channels) for all convolution ops. The larger the value, the larger the size of the layers, and more accurate the model at the cost of speed. A smaller value results in a smaller model and faster prediction time but lower accuracy. -
quantBytes - This argument controls the bytes used for weight quantization. The available options are:
4. 4 bytes per float (no quantization). Leads to highest accuracy and original model size.2. 2 bytes per float. Leads to slightly lower accuracy and 2x model size reduction.1. 1 byte per float. Leads to lower accuracy and 4x model size reduction.
The following table contains the corresponding BodyPix 2.0 model checkpoint sizes (widthout gzip) when using different quantization bytes:
Architecture quantBytes=4 quantBytes=2 quantBytes=1 ResNet50 ~90MB ~45MB ~22MB MobileNetV1 (1.00) ~13MB ~6MB ~3MB MobileNetV1 (0.75) ~5MB ~2MB ~1MB MobileNetV1 (0.50) ~2MB ~1MB ~0.6MB -
modelUrl - An optional string that specifies custom url of the model. This is useful for local development or countries that don’t have access to the models hosted on GCP.
Making a prediction
Person segmentation
Given an image with one or more people, person segmentation predicts segmentation for all people together. It returns a PersonSegmentation object corresponding to segmentation for people in the image. It does not disambiguate between different individuals. If you need to segment individuals separately use segmentMultiPerson (the caveat is this method is slower).
const segmentation = await net.segmentPerson(image, {
  flipHorizontal: false,
  internalResolution: 'medium',
  segmentationThreshold: 0.7
});
Params in segmentPerson()
- image - ImageData|HTMLImageElement|HTMLCanvasElement|HTMLVideoElement The input image to feed through the network.
- config - an optional dictionary containing:
- flipHorizontal - Defaults to false. If the segmentation & pose should be flipped/mirrored horizontally. This should be set to true for videos where the video is by default flipped horizontally (i.e. a webcam), and you want the segmentation & pose to be returned in the proper orientation.
- internalResolution - Defaults to
medium. The internal resolution percentage that the input is resized to before inference. The larger theinternalResolutionthe more accurate the model at the cost of slower prediction times. Available values arelow,medium,high,full, or a percentage value between 0 and 1. The valueslow,medium,high, andfullmap to 0.25, 0.5, 0.75, and 1.0 correspondingly. - segmentationThreshold - Defaults to 0.7. Must be between 0 and 1. For each pixel, the model estimates a score between 0 and 1 that indicates how confident it is that part of a person is displayed in that pixel. This segmentationThreshold is used to convert these values to binary 0 or 1s by determining the minimum value a pixel’s score must have to be considered part of a person. In essence, a higher value will create a tighter crop around a person but may result in some pixels being that are part of a person being excluded from the returned segmentation mask.
- maxDetections - Defaults to 10. For pose estimation, the maximum number of person poses to detect per image.
- scoreThreshold - Defaults to 0.3. For pose estimation, only return individual person detections that have root part score greater or equal to this value.
- nmsRadius - Defaults to 20. For pose estimation, the non-maximum suppression part distance in pixels. It needs to be strictly positive. Two parts suppress each other if they are less than
nmsRadiuspixels away.
Returns
It returns a Promise that resolves with a SemanticPersonSegmentation object. Multiple people in the image get merged into a single binary mask. In addition to width, height, and data fields, it returns a field allPoses which contains poses for all people.
// the data array for the all people containing 307200 values, one for each pixel of the 640x480 image.
{
  width: 640,
  height: 480,
  data: Uint8Array(307200) [0, 0, 0, 0, 0, 0, 0, 0, 0, 0, 0, 0, 0, 1, 0, 0, 1, …],
  allPoses: [{"score": 0.4, "keypoints": […]}, …]
}
Person body part segmentation
Given an image with one or more people, BodyPix’s segmentPersonParts method predicts the 24 body part segmentations for all people. It returns a PartSegmentation object corresponding to body parts for each pixel for all people merged. If you need to segment individuals separately use segmentMultiPersonParts (the caveat is this method is slower).
The Body Parts
The PartSegmentation object contains a width, height, Pose and an Int32Array with a part id from 0-24 for the pixels that are part of a corresponding body part, and -1 otherwise.
| Part Id | Part Name | Part Id | Part Name |
|---|---|---|---|
| 0 | left_face | 12 | torso_front |
| 1 | right_face | 13 | torso_back |
| 2 | left_upper_arm_front | 14 | left_upper_leg_front |
| 3 | left_upper_arm_back | 15 | left_upper_leg_back |
| 4 | right_upper_arm_front | 16 | right_upper_leg_front |
| 5 | right_upper_arm_back | 17 | right_upper_leg_back |
| 6 | left_lower_arm_front | 18 | left_lower_leg_front |
| 7 | left_lower_arm_back | 19 | left_lower_leg_back |
| 8 | right_lower_arm_front | 20 | right_lower_leg_front |
| 9 | right_lower_arm_back | 21 | right_lower_leg_back |
| 10 | left_hand | 22 | left_feet |
| 11 | right_hand | 23 | right_feet |
Note: Part Id value -1 represents the non-person background)
const segmentation = await net.segmentPersonParts(image, {
  flipHorizontal: false,
  internalResolution: 'medium',
  segmentationThreshold: 0.7
});
Params in segmentPersonParts
- image - ImageData|HTMLImageElement|HTMLCanvasElement|HTMLVideoElement The input image to feed through the network.
- config - an object containing:
- flipHorizontal - Defaults to false. If the segmentation & pose should be flipped/mirrored horizontally. This should be set to true for videos where the video is by default flipped horizontally (i.e. a webcam), and you want the segmentation & pose to be returned in the proper orientation.
- internalResolution - Defaults to ‘medium’. The internal resolution used by the model. The larger the internal resolution the more accurate the model at the cost of slower prediction times. Available values are ‘low’, ‘medium’, ‘high’ or a positive number.
- segmentationThreshold - Must be between 0 and 1. For each pixel, the model estimates a score between 0 and 1 that indicates how confident it is that part of a person is displayed in that pixel. This segmentationThreshold is used to convert these values to binary 0 or 1s by determining the minimum value a pixel’s score must have to be considered part of a person. In essence, a higher value will create a tighter crop around a person but may result in some pixels being that are part of a person being excluded from the returned segmentation mask.
- maxDetections - Defaults to 10. For pose estimation, the maximum number of person pose to detect per image.
- scoreThreshold - Defaults to 0.4. For pose estimation, only return individual person detections that have root part score greater or equal to this value.
- nmsRadius - Defaults to 20. For pose estimation, the non-maximum suppression part distance in pixels. It needs to be strictly positive. Two parts suppress each other if they are less than
nmsRadiuspixels away.
Returns
It returns a Promise that resolves with a SemanticPartSegmentation object. When there are multiple people in the image they are merged into a single array of part values. In addition to width, height, and data fields, it returns a field allPoses which contains poses for all people..
// The array contains 307200 values, one for each pixel of the 640x480 image
// that was passed to the function.
{
  width: 680,
  height: 480,
  data: Int32Array(307200) [0, 0, 0, 0, 0, 0, 0, 0, 0, 0, 2, 2, 0, 1, 0, 0, …],
  allPoses: [{"score": 0.4, "keypoints": […]}, …]
}
Multi-person segmentation
Given an image with multiple people, multi-person segmentation model predicts segmentation for each person individually. It returns an array of PersonSegmentation and each corresponding to one person. Each element is a binary array for one person with 1 for the pixels that are part of the person, and 0 otherwise. The array size corresponds to the number of pixels in the image.
If you don’t need to segment individuals separately then use segmentPerson which is faster and does not segment individuals.
const segmentation = await net.segmentMultiPerson(image, {
  flipHorizontal: false,
  internalResolution: 'medium',
  segmentationThreshold: 0.7,
  maxDetections: 10,
  scoreThreshold: 0.2,
  nmsRadius: 20,
  minKeypointScore: 0.3,
  refineSteps: 10
});
Params in segmentMultiPerson()
- image - ImageData|HTMLImageElement|HTMLCanvasElement|HTMLVideoElement The input image to feed through the network.
- config - an optional dictionary containing:
- flipHorizontal - Defaults to false. If the segmentation & pose should be flipped/mirrored horizontally. This should be set to true for videos where the video is by default flipped horizontally (i.e. a webcam), and you want the segmentation & pose to be returned in the proper orientation.
- internalResolution - Defaults to ‘medium’. The internal resolution used by the model. The larger the internal resolution the more accurate the model at the cost of slower prediction times. Available values are ‘low’, ‘medium’, ‘high’ or a positive number.
- segmentationThreshold - Defaults to 0.7. Must be between 0 and 1. For each pixel, the model estimates a score between 0 and 1 that indicates how confident it is that part of a person is displayed in that pixel. This segmentationThreshold is used to convert these values to binary 0 or 1s by determining the minimum value a pixel’s score must have to be considered part of a person. In essence, a higher value will create a tighter crop around a person but may result in some pixels being that are part of a person being excluded from the returned segmentation mask.
- maxDetections - Defaults to 10. Maximum number of returned individual person detections per image.
- scoreThreshold - Defaults to 0.4. Only return individual person detections that have root part score greater or equal to this value.
- nmsRadius - Defaults to 20. Non-maximum suppression part distance in pixels. It needs to be strictly positive. Two parts suppress each other if they are less than
nmsRadiuspixels away. - minKeypointScore - Default to 0.3. Keypoints above the score are used for matching and assigning segmentation mask to each person..
- refineSteps - Default to 10. The number of refinement steps used when assigning the individual person segmentations. It needs to be strictly positive. The larger the higher the accuracy and slower the inference.
Returns
It returns a Promise that resolves with an array of PersonSegmentations. When there are multiple people in the image, each PersonSegmentation object in the array represents one person. More details about the PersonSegmentation object can be found in the documentation of the segmentPerson method. In addition to width, height, and data fields, PersonSegmentation object also has a field pose. It contains each person’s pose same as PoseNet, but less accurate.
[{
  width: 640,
  height: 480,
  data: Uint8Array(307200) [0, 0, 0, 0, 0, 0, 0, 0, 0, 0, 0, 0, 0, 1, 1, 1, 1 …],
  pose: {"score": 0.4, "keypoints": […]}
 },
 ...
 // the data array for the 1st person containing 307200 values, one for each pixel of the 640x480 image.
 {
  width: 640,
  height: 480,
  data: Uint8Array(307200) [0, 0, 0, 0, 0, 0, 0, 0, 0, 0, 0, 0, 0, 1, 0, 0, 1, …],
  pose: {"score": 0.4, "keypoints": […]}
 }]
 // the data array for the n-th person containing 307200 values, one for each pixel of the 640x480 image.
Multi-person body part segmentation
Given an image with multiple people. BodyPix’s segmentMultiPersonParts method predicts the 24 body part segmentations for each person. It returns an array of PartSegmentations, each corresponding to one of the people. The PartSegmentation object contains a width, height, Pose and an Int32Array with a part id from 0-24 for the pixels that are part of a corresponding body part, and -1 otherwise.
See the table in the documentation of segmentPersonParts for the values for each part.

const segmentation = await net.segmentMultiPersonParts(image, {
  flipHorizontal: false,
  internalResolution: 'medium',
  segmentationThreshold: 0.7,
  maxDetections: 10,
  scoreThreshold: 0.2,
  nmsRadius: 20,
  minKeypointScore: 0.3,
  refineSteps: 10
});
Params in segmentMultiPersonParts
- image - ImageData|HTMLImageElement|HTMLCanvasElement|HTMLVideoElement The input image to feed through the network.
- config - an object containing:
- flipHorizontal - Defaults to false. If the segmentation & pose should be flipped/mirrored horizontally. This should be set to true for videos where the video is by default flipped horizontally (i.e. a webcam), and you want the segmentation & pose to be returned in the proper orientation.
- internalResolution - Defaults to ‘medium’. The internal resolution used by the model. The larger the internal resolution the more accurate the model at the cost of slower prediction times. Available values are ‘low’, ‘medium’, ‘high’ or a positive number.
- segmentationThreshold - Must be between 0 and 1. For each pixel, the model estimates a score between 0 and 1 that indicates how confident it is that part of a person is displayed in that pixel. This segmentationThreshold is used to convert these values to binary 0 or 1s by determining the minimum value a pixel’s score must have to be considered part of a person. In essence, a higher value will create a tighter crop around a person but may result in some pixels being that are part of a person being excluded from the returned segmentation mask.
- maxDetections - Defaults to 10. Maximum number of returned individual person detections per image.
- scoreThreshold - Defaults to 0.4. Only return individual person detections that have root part score greater or equal to this value.
- nmsRadius - Defaults to 20. Non-maximum suppression part distance in pixels. It needs to be strictly positive. Two parts suppress each other if they are less than
nmsRadiuspixels away. - minKeypointScore - Default to 0.3. Keypoints above the score are used for matching and assigning segmentation mask to each person.
- refineSteps - Default to 10. The number of refinement steps used when assigning the individual person segmentations. It needs to be strictly positive. The larger the higher the accuracy and slower the inference.
Returns
It returns a Promise that resolves with an array of PartSegmentations. When there are multiple people in the image, each PartSegmentation object in the array represents one person. More details about the PartSegmentation object can be found in the documentation of the segmentPersonParts method. In addition to width, height, and data fields, PartSegmentation object also has a field pose. It contains each person’s pose same as PoseNet, but less accurate.
[{
  width: 680,
  height: 480,
  data: Int32Array(307200) [-1, -1, -1, -1, -1, -1, 15, 15 …],
  pose: {"score": 0.4, "keypoints": […]}
},
{
  width: 680,
  height: 480,
  data: Int32Array(307200) [2, 2, -1, -1, -1, -1, -1, -1 …],
  pose: {"score": 0.4, "keypoints": […]}
}]
// The array contains 307200 values, one for each pixel of the 640x480 image
// that was passed to the function.
Output Visualization Utility Functions
BodyPix contains utility functions to help with drawing and compositing using the outputs. These API methods are experimental and subject to change.
bodyPix.toMask
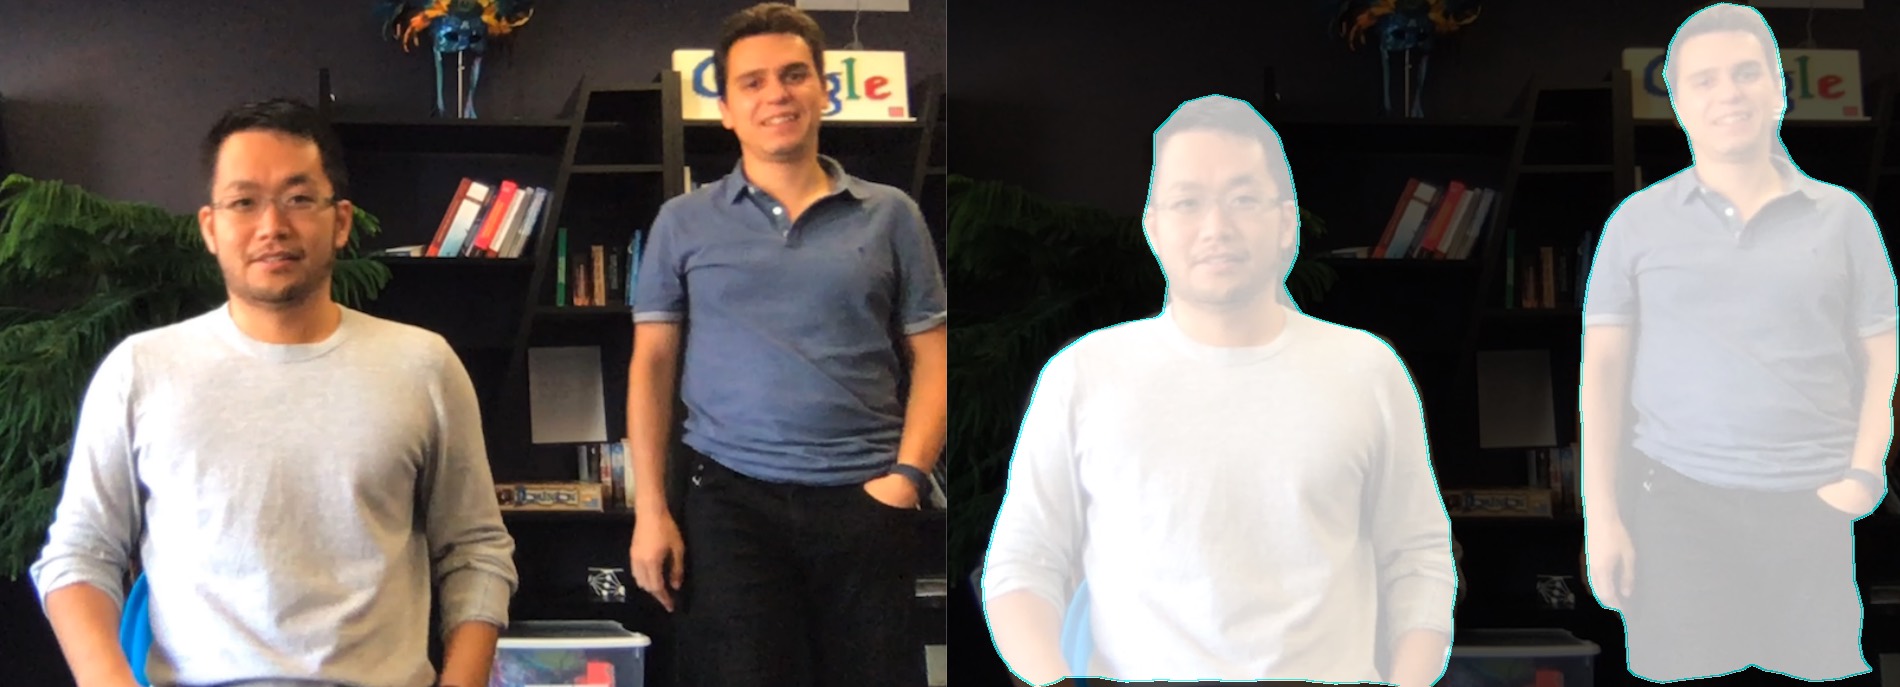
Given the output of person segmentation (or multi-person segmentation), generates a visualization of each pixel determined by the corresponding binary segmentation value at the pixel from the output. In other words, pixels where there is a person will be colored by the foreground color and where there is not a person will be colored by the background color. This can be used as a mask to crop a person or the background when compositing.
Inputs
- personSegmentation The output from segmentPerson or segmentMultiPerson. The former is a SemanticPersonSegmentation object and later is an array of PersonSegmentation object.
-
foreground The foreground color (r,g,b,a) for visualizing pixels that belong to people.
-
background The background color (r,g,b,a) for visualizing pixels that don’t belong to people.
- drawContour Whether to draw the contour around each person’s segmentation mask.
Returns
An ImageData with the same width and height of the personSegmentation, with color and opacity at each pixel determined by the corresponding binary segmentation value at the pixel from the output.
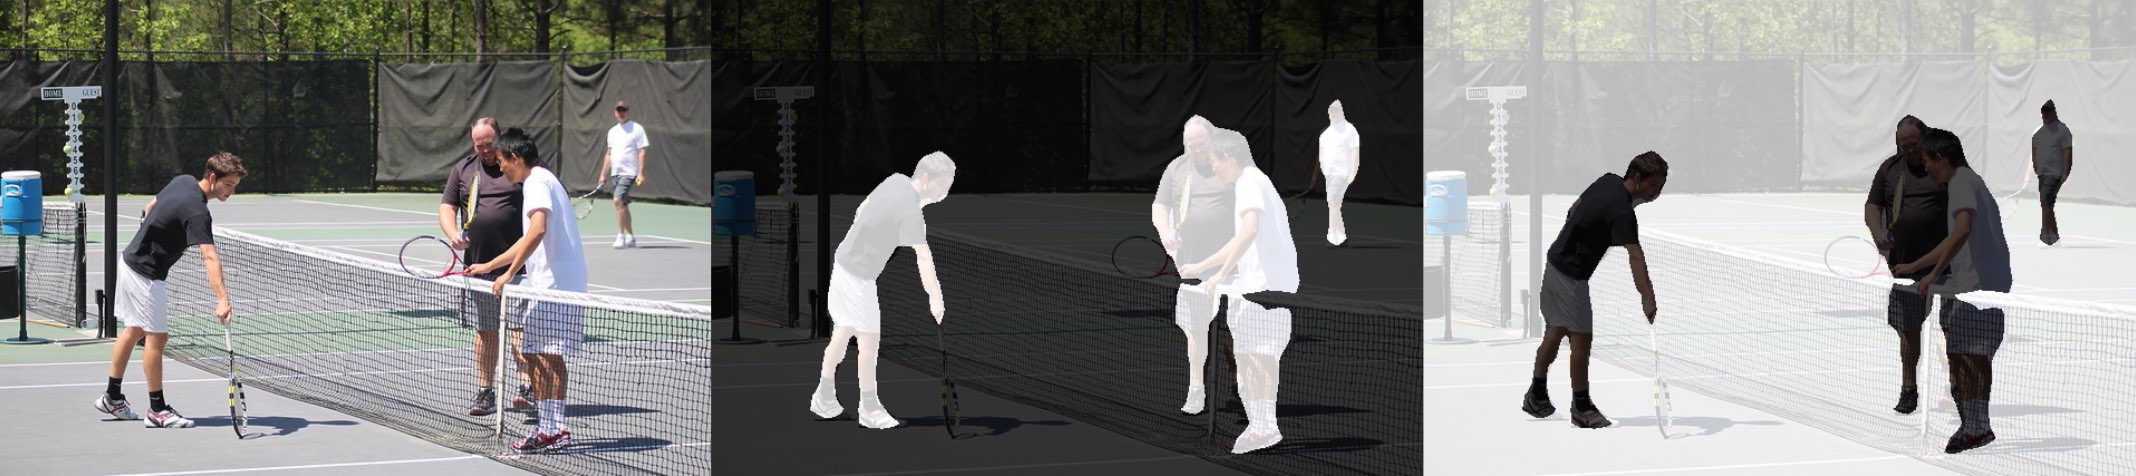
With the output from segmentMultiPerson on the first image above, toMask will produce an ImageData that either looks like the second image above if setting foregroundColor to {r: 0, g: 0, b: 0, a: 0} and backgroundColor to {r: 0, g: 0, b: 0, a: 255} (by default), or the third image if if setting foregroundColor to {r: 0, g: 0, b: 0, a: 255} and backgroundColor to {r: 0, g: 0, b: 0, a: 0}. This can be used to mask either the person or the background using the method drawMask.
Example usage
const img = document.getElementById('image');

const net = await bodyPix.load();
const segmentation = await net.segmentPerson(img);

// The mask image is an binary mask image with a 1 where there is a person and
// a 0 where there is not.
const coloredPartImage = bodyPix.toMask(segmentation);
const opacity = 0.7;
const flipHorizontal = false;
const maskBlurAmount = 0;
const canvas = document.getElementById('canvas');
// Draw the mask image on top of the original image onto a canvas.
// The colored part image will be drawn semi-transparent, with an opacity of
// 0.7, allowing for the original image to be visible under.
bodyPix.drawMask(
    canvas, img, coloredPartImage, opacity, maskBlurAmount,
    flipHorizontal);
bodyPix.toColoredPartMask
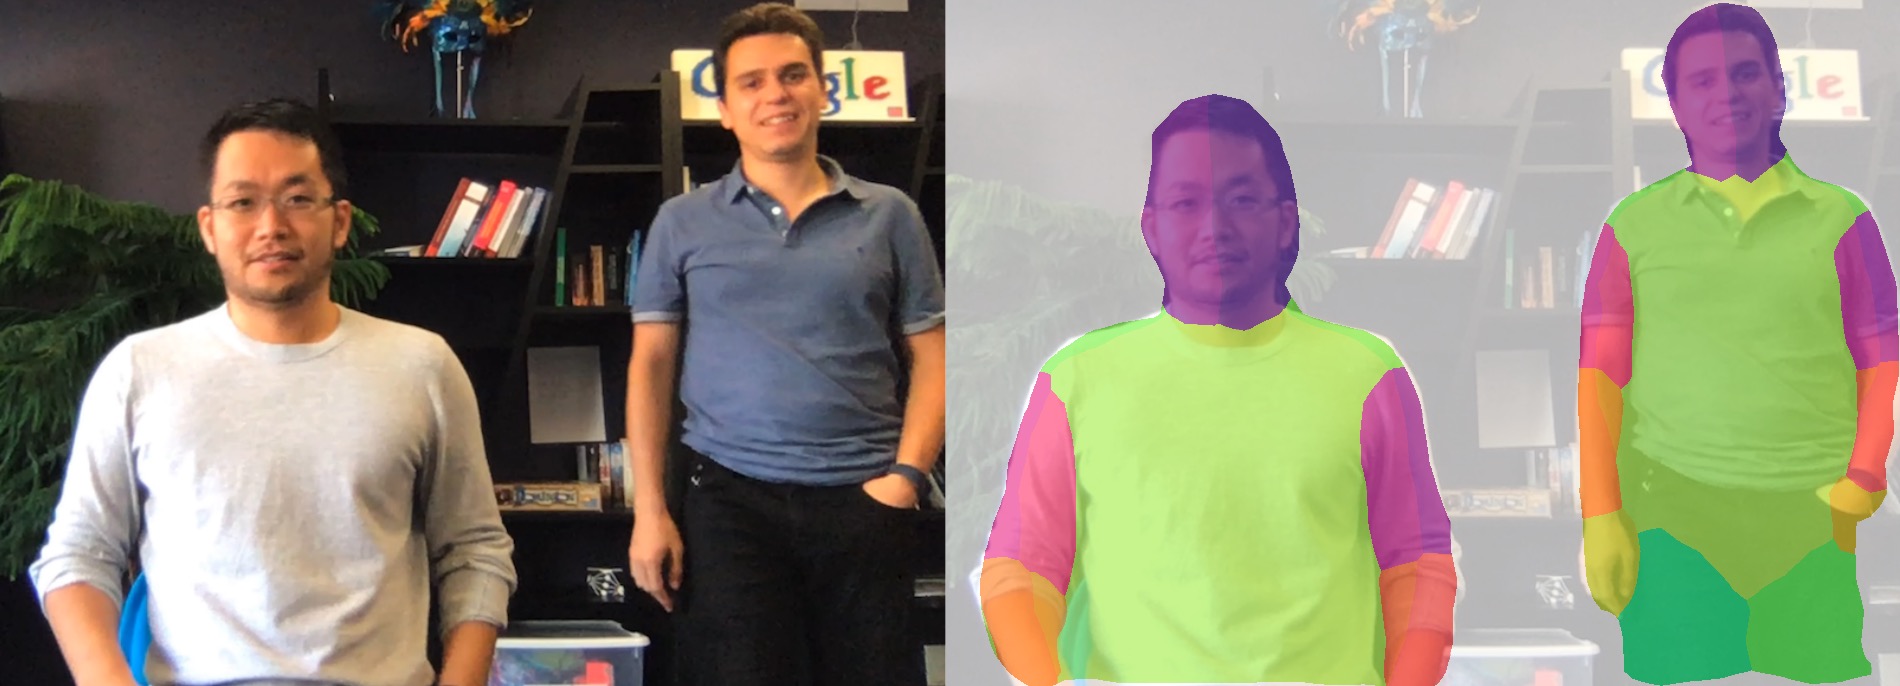
Given the output from person body part segmentation (or multi-person body part segmentation) and an array of colors indexed by part id, generates an image with the corresponding color for each part at each pixel, and white pixels where there is no part.
Inputs
-
personPartSegmentation The output from segmentPersonParts or segmentMultiPersonParts. The former is a SemanticPartSegmentation object and later is an array of PartSegmentation object.
-
partColors Optional, defaults to rainbow. A multi-dimensional array of rgb colors indexed by part id. Must have 24 colors, one for every part. For some sample
partColorscheck out the ones used in the demo.
Returns
An ImageData with the same width and height of the estimated person part segmentation, with the corresponding color for each part at each pixel, and black pixels where there is no part.
Example usage
const img = document.getElementById('image');

const net = await bodyPix.load();
const partSegmentation = await net.segmentMultiPersonParts(img);

// The colored part image is an rgb image with a corresponding color from the
// rainbow colors for each part at each pixel, and black pixels where there is
// no part.
const coloredPartImage = bodyPix.toColoredPartMask(partSegmentation);
const opacity = 0.7;
const flipHorizontal = false;
const maskBlurAmount = 0;
const canvas = document.getElementById('canvas');
// Draw the colored part image on top of the original image onto a canvas.
// The colored part image will be drawn semi-transparent, with an opacity of
// 0.7, allowing for the original image to be visible under.
bodyPix.drawMask(
    canvas, img, coloredPartImage, opacity, maskBlurAmount,
    flipHorizontal);
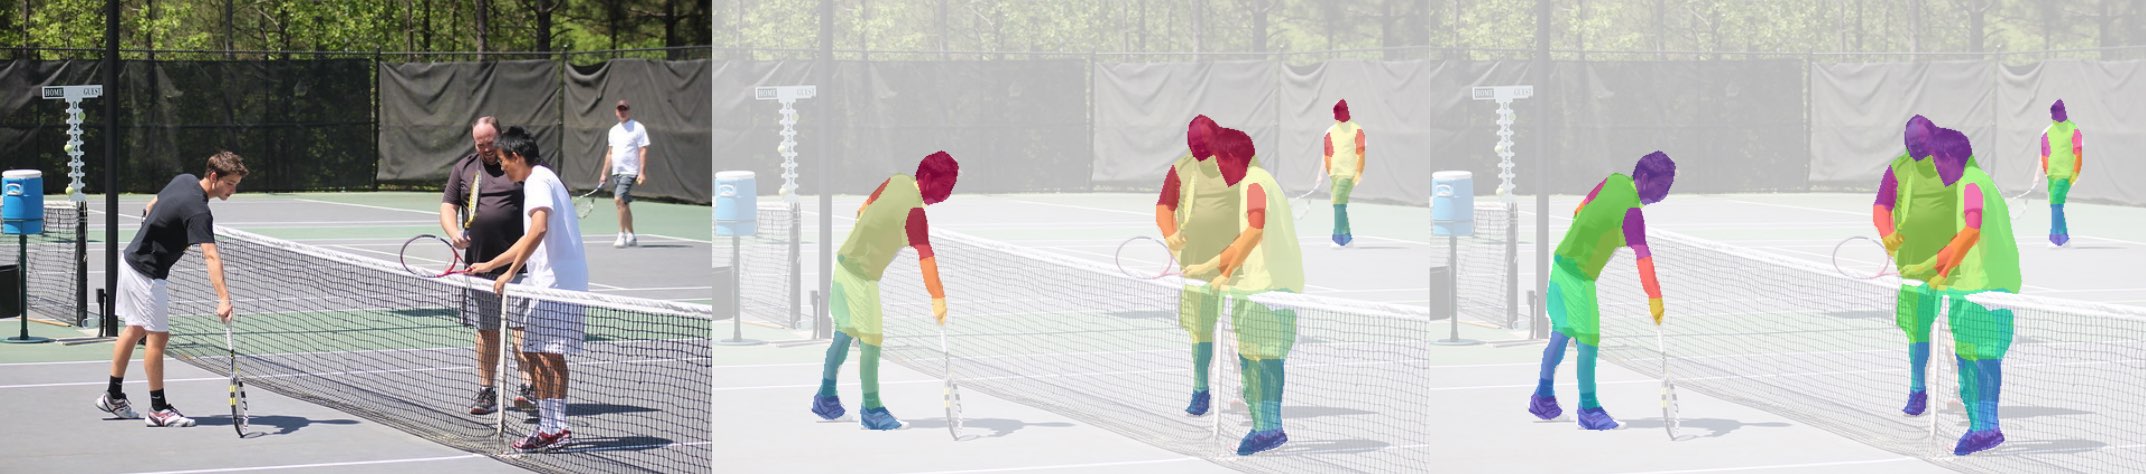
With the output from segmentMultiPersonParts on the first image above, a ‘spectral’ or ‘rainbow’ color scale in toColoredPartMask will produce an ImageData that looks like the second image or the third image above.
bodyPix.drawMask
Draws an image onto a canvas and draws an ImageData containing a mask on top of it with a specified opacity; The ImageData is typically generated using toMask or toColoredPartMask.
Inputs
- canvas The canvas to be drawn onto.
- image The original image to apply the mask to.
- maskImage An ImageData containing the mask. Ideally this should be generated by
toMaskortoColoredPartMask. - maskOpacity The opacity when drawing the mask on top of the image. Defaults to 0.7. Should be a float between 0 and 1.
- maskBlurAmount How many pixels to blur the mask by. Defaults to 0. Should be an integer between 0 and 20.
- flipHorizontal If the result should be flipped horizontally. Defaults to false.
Example usage
const img = document.getElementById('image');

const net = await bodyPix.load();
const segmentation = await net.segmentPerson(img);

const maskBackground = true;
// Convert the segmentation into a mask to darken the background.
const foregroundColor = {r: 0, g: 0, b: 0, a: 0};
const backgroundColor = {r: 0, g: 0, b: 0, a: 255};
const backgroundDarkeningMask = bodyPix.toMask(
    segmentation, foregroundColor, backgroundColor);

const opacity = 0.7;
const maskBlurAmount = 3;
const flipHorizontal = false;
const canvas = document.getElementById('canvas');
// Draw the mask onto the image on a canvas.  With opacity set to 0.7 and
// maskBlurAmount set to 3, this will darken the background and blur the
// darkened background's edge.
bodyPix.drawMask(
    canvas, img, backgroundDarkeningMask, opacity, maskBlurAmount, flipHorizontal);
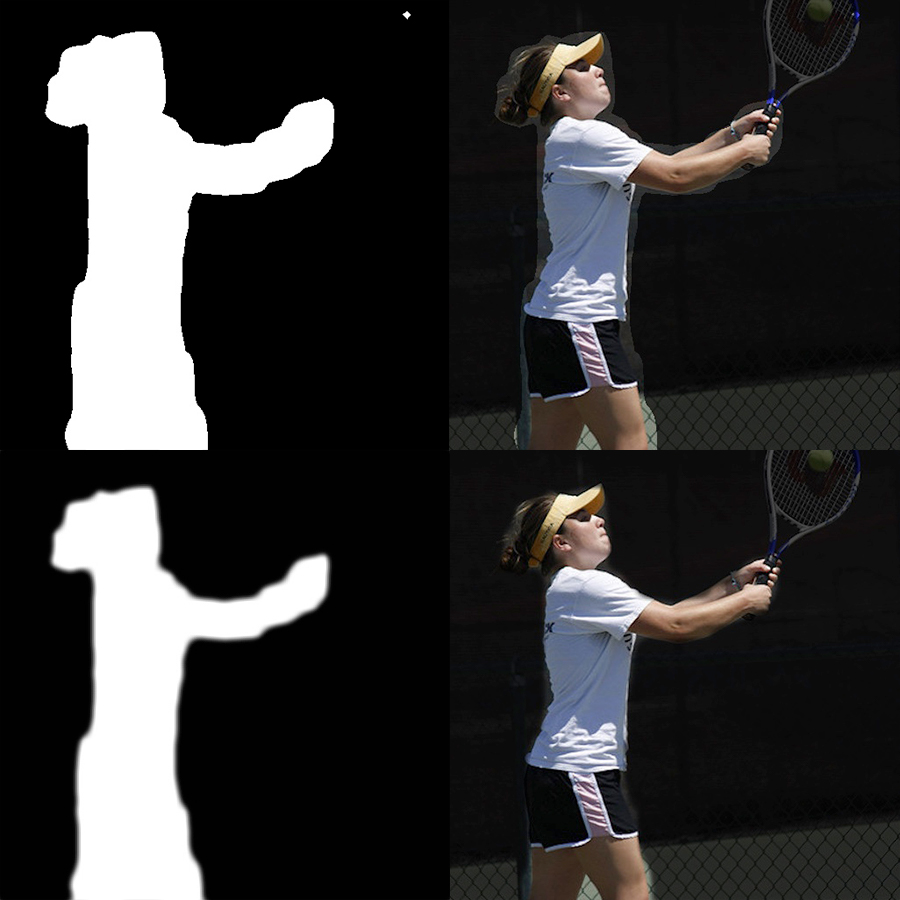
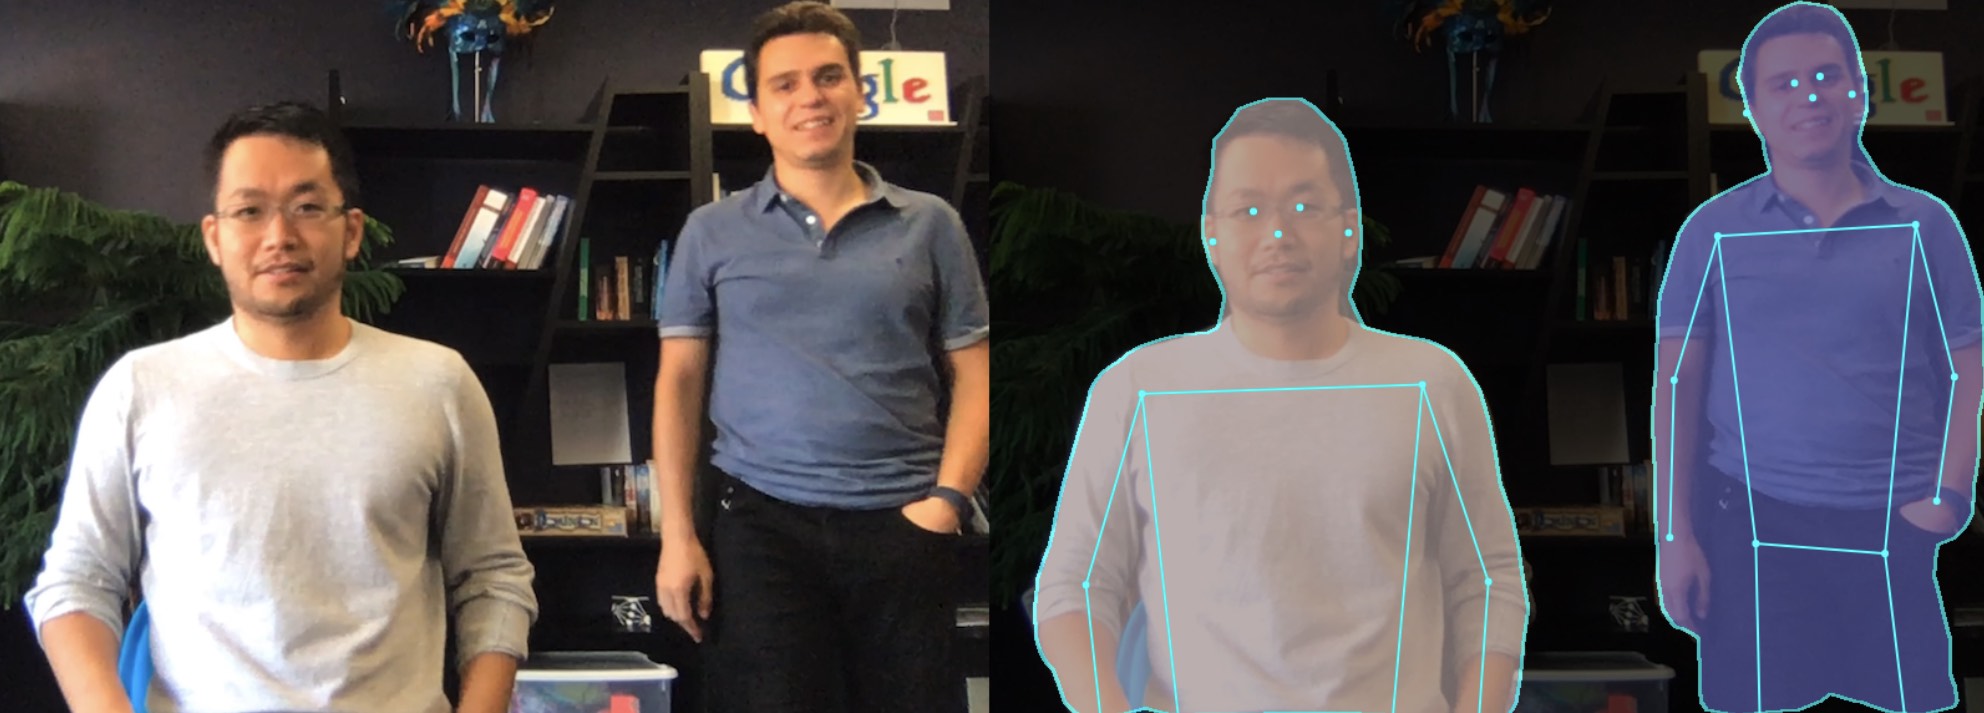
The above shows drawing a mask generated by toMask on top of an image and canvas using toMask. In this case, segmentationThreshold was set to a lower value of 0.25, making the mask include more pixels. The top two images show the mask drawn on top of the image, and the second two images show the mask blurred by setting maskBlurAmount to 9 before being drawn onto the image, resulting in a smoother transition between the person and the masked background.
bodyPix.drawPixelatedMask
Draws an image onto a canvas and draws an ImageData containing a mask on top of it with a specified opacity; The ImageData is typically generated using toColoredPartMask. Different from drawMask, this rendering function applies the pixelation effect to the BodyPix’s body part segmentation prediction. This allows a user to display low resolution body part segmentation and thus offers an aesthetic interpretation of the body part segmentation prediction.
Inputs
- canvas The canvas to be drawn onto.
- image The original image to apply the mask to.
- maskImage An ImageData containing the mask. Ideally this should be generated by
toColoredPartMask. - maskOpacity The opacity when drawing the mask on top of the image. Defaults to 0.7. Should be a float between 0 and 1.
- maskBlurAmount How many pixels to blur the mask by. Defaults to 0. Should be an integer between 0 and 20.
- flipHorizontal If the result should be flipped horizontally. Defaults to false.
- pixelCellWidth The width of each pixel cell. Default to 10 px.
Example usage
const img = document.getElementById('image');

const net = await bodyPix.load();
const partSegmentation = await net.segmentPersonParts(img);

// The colored part image is an rgb image with a corresponding color from the
// rainbow colors for each part at each pixel, and white pixels where there is
// no part.
const coloredPartImage = bodyPix.toColoredPartMask(partSegmentation);
const opacity = 0.7;
const flipHorizontal = false;
const maskBlurAmount = 0;
const pixelCellWidth = 10.0;
const canvas = document.getElementById('canvas');
// Draw the pixelated colored part image on top of the original image onto a
// canvas.  Each pixel cell's width will be set to 10 px. The pixelated colored
// part image will be drawn semi-transparent, with an opacity of 0.7, allowing
// for the original image to be visible under.
bodyPix.drawPixelatedMask(
    canvas, img, coloredPartImage, opacity, maskBlurAmount,
    flipHorizontal, pixelCellWidth);
![]()
The pixelation effect is applied to part image using drawPixelatedMask; the result is shown in the image above.
bodyPix.drawBokehEffect
Given a personSegmentation and an image, draws the image with its background blurred onto a canvas.
An example of applying a bokeh effect can be seen in this demo:

Inputs
- canvas The canvas to draw the background-blurred image onto.
- image The image to blur the background of and draw.
- personSegmentation The output from segmentPerson or segmentMultiPerson. The former is a SemanticPersonSegmentation object and later is an array of PersonSegmentation object.
- backgroundBlurAmount How many pixels in the background blend into each other. Defaults to 3. Should be an integer between 1 and 20.
- edgeBlurAmount How many pixels to blur on the edge between the person and the background by. Defaults to 3. Should be an integer between 0 and 20.
- flipHorizontal If the output should be flipped horizontally. Defaults to false.
Example Usage
const img = document.getElementById('image');

const net = await bodyPix.load();
const segmentation = await net.segmentPerson(img);

const backgroundBlurAmount = 3;
const edgeBlurAmount = 3;
const flipHorizontal = false;

const canvas = document.getElementById('canvas');
// Draw the image with the background blurred onto the canvas. The edge between
// the person and blurred background is blurred by 3 pixels.
bodyPix.drawBokehEffect(
    canvas, img, segmentation, backgroundBlurAmount,
    edgeBlurAmount, flipHorizontal);
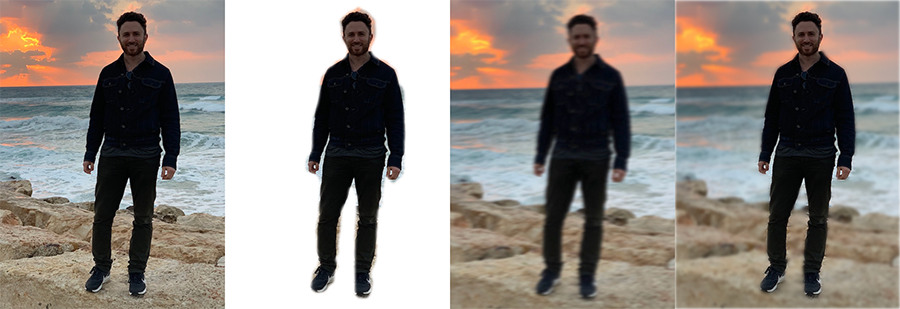
The above shows the process of applying a ‘bokeh’ effect to an image (the left-most one) with drawBokehEffect. An inverted mask is generated from a personSegmentation. The original image is then drawn onto the canvas, and using the canvas compositing operation destination-over the mask is drawn onto the canvas, causing the background to be removed. The original image is blurred and drawn onto the canvas where it doesn’t overlap with the existing image using the compositing operation destination-over. The result is seen in the right-most image.
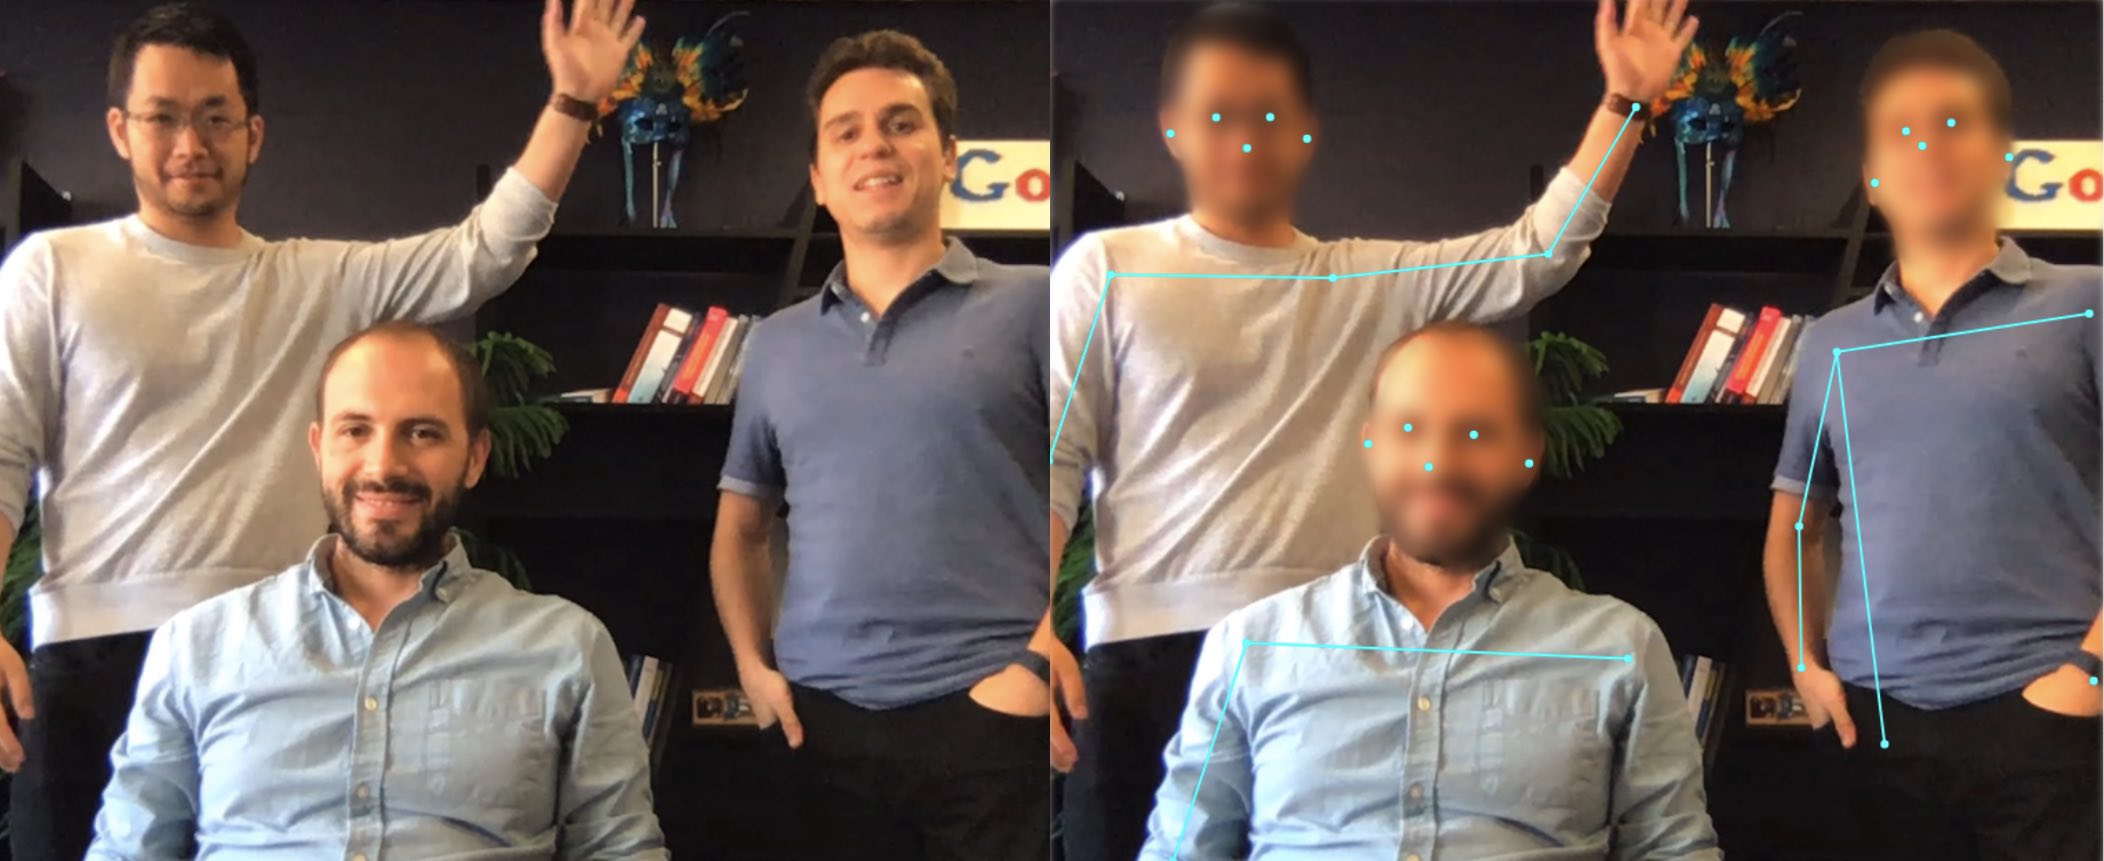
bodyPix.blurBodyPart
Given a PartSegmentation (or an array of PartSegmentation) and an image, blurs some person body parts (e.g. left face and right face).
An example of applying a body part blur on left_face and right_face body parts (other body parts can be specified):
Inputs
- canvas The canvas to draw the body-part blurred image onto.
- image The image with people to blur the body-part and draw.
- partSegmentation The output from segmentPersonParts or segmentMultiPersonParts. The former is a SemanticPartSegmentation object and later is an array of PartSegmentation object.
- bodyPartIdsToBlur Default to [0, 1] (left-face and right-face). An array of body part ids to blur. Each must be one of the 24 body part ids.
- backgroundBlurAmount How many pixels in the background blend into each other. Defaults to 3. Should be an integer between 1 and 20.
- edgeBlurAmount How many pixels to blur on the edge between the person and the background by. Defaults to 3. Should be an integer between 0 and 20.
- flipHorizontal If the output should be flipped horizontally. Defaults to false.
Example Usage
const img = document.getElementById('image');

const net = await bodyPix.load();
const partSegmentation = await net.segmentMultiPersonParts(img);

const backgroundBlurAmount = 3;
const edgeBlurAmount = 3;
const flipHorizontal = false;
const faceBodyPartIdsToBlur = [0, 1];

const canvas = document.getElementById('canvas');

bodyPix.blurBodyPart(
    canvas, img, partSegmentation, faceBodyPartIdsToBlur,
    backgroundBlurAmount, edgeBlurAmount, flipHorizontal);
Developing the Demos
Details for how to run the demos are included in the demos/ folder.